Secura Lecta Credit Farm
A method of earning credits that combines Secura Lecta and Ensnare, which is becoming popular recently. This method is usually used in Grineer and Orokin Survival missions on the Steel Path. It is easier to prepare the equipment compared to the Profit Taker run, but it could be changed in the future because of very unique mechanics.
See the video below for details on how that works.
[Warframe] Secura Lecta Credit Farm | Chroma
Builds
Importance: Red > Blue > Brown
Alternatives: Black
Secura Lecta
It’s important to quickly inflict 10 Gas stacks and at least 1 Electricity stack on many enemies and maintain those stacks. What you need is not a strong build, but a reasonably weak build with kill speed adjusted to avoid destroying the mass of enemies you gather.
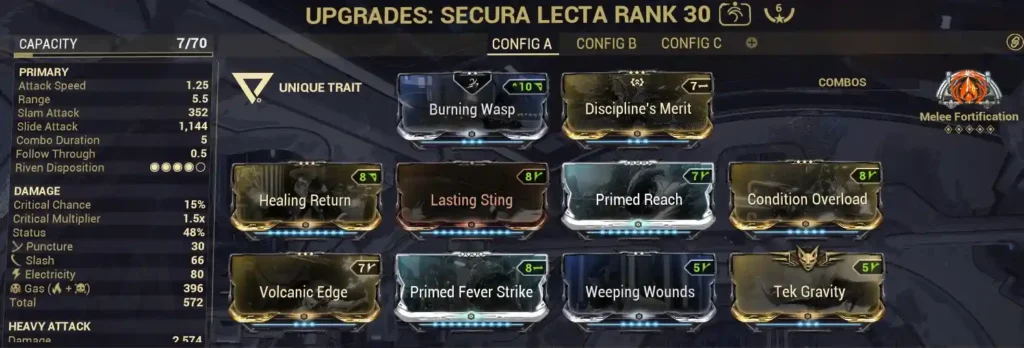
Mods
Primd Fever Strike, Volcanic Edge
By increasing the proportion of Gas, Gas Status Effects are more likely to occur than Electricity Status Effects. That also reduces the chance of Electricity stun effects causing undesired death animations.
Weeping Wounds, Lasting Sting
Needless to say, Status Chance is important. Status Duration contributes to maintaining stacks.
Burning Wasp
The other Stance mod, Coiling Viper, is unsuitable because it frequently makes enemies lifted.
Primed Reach
Most of the damage is reduced to 0 by Follow Through, but it is important that the range of inflicting Status Effects increases.
Condition Overload, (Primed) Pressure Point
Base damage is subject to kill speed adjustments. It is also necessary to consider aspects indirectly related to damage such as Corrosive Projection and enemy factions. Even Pressure Point or not using base damage mods is an option. I haven’t tried it, but a Riven mod with negative damage could be useful for keeping the mass of enemies against Corpus and Infested.
Discipline’s Merit
By changing the frequency of Tennokai use, you can adjust the amount of damage dealt during a mission. If your kill speed is reduced due to something like Leech Eximus or Guardian Eximus, you can compensate by using Tennokai more often.
Healing Return
It greatly contributes to survivability but may be unnecessary depending on the Warframe build.
Tek Gravity
You can gather enemies while wielding Secura Lecta, but the drawback is that you also need to use a mod slot on Warframe to enhance the set effect.
Berserker Fury, Primed Fury
By increasing Attack Speed, you will be able to inflict Status Effects on enemies more quickly. Arcane Strike is also fine.
Arcanes
Melee Fortification
It is chosen by elimination method because other Arcanes have some problems as written below.
Melee Duplicate
It also duplicate the chance to inflict Status Effects, allowing you to inflict the necessary stacks on enemies a little faster. However, since it is necessary to use Blood Rush and the damage dealt to enemies increases, major adjustments will be required from this build. It’s probably not worth the current poor availability.
Melee Vortex
The effect is useful, but Magnetic is incompatible with Electricity. Even if you add Swipe, Duplex Bond, Frost Jaw, and Shock Collar to Smeeta Kavat, it will only activate a few times every 5 minutes. If Charm are changed or a Magnetic melee mod is implemented, it will be the best choice.
Melee Influence (rank 0)
The advantage is that you can instantaneously inflict many stacks of Gas and Electricity, but the disadvantage is that it is too strong. The effect damage doesn’t decay like a melee attack with Follow Through, but instead the same amount of damage is spread within the area, making it easier for enemies to die at the same time. Even the build below will give you less credits than the build above, especially against Orokin.
Chroma

Helminth
Ensnare
The only Helminth ability that allows you to gather enemies without affecting death animations.
Mods
Fleeting Expertise, Streamline
It is necessary to shorten Ability Duration in order to be able to use Ensnare at short intervals. To minimize Effigy’s energy consumption per second with 40% Ability Duration, Ability Efficiency of 190% is required. Streamline is not necessary if your companion has Seismic Bond, in which case you need to be aware of the Ability Efficiency when activating Effigy.
Overextended, Stretch
Ability Range affects the amount of enemies that can be gathered by Ensnare. Since the farming efficiency deteriorates if enemies get caught in obstacles, a too large range may decrease the number of suitable tiles.
Hunter Adrenaline
One of the ways you can recover energy while using Effigy. The use of Decaying Dragon Key, which caps the invulnerability duration by Shield Gating to 0.33 seconds, is an option to stabilize the energy supply at the cost of some survivability.
Adaptation, (Umbral) Vitality
Armor has a lower priority than usual among the means to ensure survivability because it is halved while Effigy is activated.
Primed Sure Footed, Handspring, Sure Footed + Fortitude
Countermeasures against the abilities used by Arson Eximus and Blitz Eximus. If you don’t have Primed Sure Footed, Handspring may be sufficient instead of the combination of Sure Footed and Fortitude, as your actions will still be hindered by the knockback even if you have full knockdown immunity.
Tek Collateral
Used solely to increase the Tek Set Bonus. The reason for rank 0 is to suppress the damage fluctuation due to Charm’s Critical Chance buff.
Corrosive Projection
A slot for adjusting kill speed.
Guardian Armor
Allows Vex Armor to be maintained even with short Ability Duration, but does not protect the Effigy sentry. Although the effect is modest due to the low Ability Strength, it is an option especially for health recovery.
Arcanes
Arcane Strike
Used in place of an attack speed mod on the melee.
Arcane Blessing, Arcane Reaper, Arcane Grace, Arcane Gurdian
You can get enough Health Orbs for Arcane Blessing with Synth Deconstruct + Seismic Bond (or Swipe). Health healing Arcanes can be used in place of Healing Return.
Arcane Fury
There is also an option to replace the melee base damage mod with it.
Arcane Nullifier
Dodging the ability of Energy Leech Eximus within a narrow range is not easy.
Archon Shards
Since Ensnare is used a lot, the Casting Speed bonus of Amber has a great impact. Azure, which provides survivability, Amber’s effectiveness on Energy Orbs, and Violet’s Equilibrium effect are somewhat useful.
Smeeta Kavat
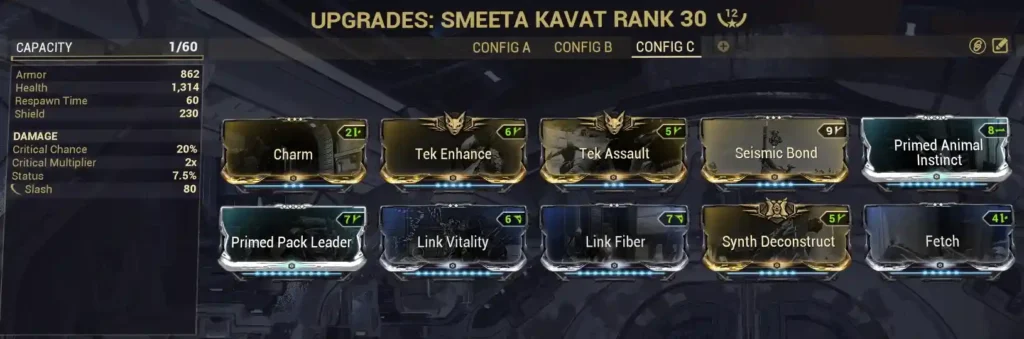
Charm, Tek Enhance
Charm’s Affinity buff doubles the amount of credits you receive, and Tek Enhance extend the buff duration. It is a disadvantage that the damage dealt changes unintentionally due to the Critical Chance buff, but it is only a minor point compared to the advantage.
Synth Deconstruct, Seismic Bond, Swipe
Used to create Health Orbs for Arcane Blessing. The channeled ability condition of Seismic Bond can be met with Effigy, and the shockwave can hit more enemies than Swipe when enemies are gathered together.
Tek Assault
If Tek Gravity is used, it should obviously be put for the Set Bonus, and even if not, it is still a strong option because preventing the Kavat death is important.
Sporelacer (Secondary)
※ This build, with Barrel Diffusion instead of Galvanized Diffusion, was actually used for the 20min run in the video. The inconsistency occurred because I replaced the Survival part after the Dante update.
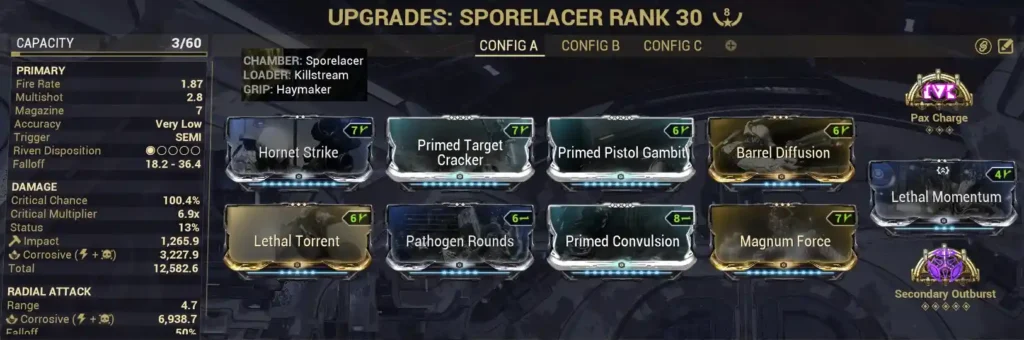
Critical and Corrosive are important as it is used to defeat Acolytes. This build with 12x Secondary Outburst activated can one-shot them if the bullets hit them well, but there are times when the bullets will be blocked by other enemies and need two shots. You can take your time to defeat low-threat Acolytes such as Angst with heavy attacks, but if you’re too greedy, you may die.
This weapon can also be used to strip the Overguard of annoying Eximus that spam abilities from a distance.
Tiles
A flat and wide tile where many enemies spawn and Ensnare won’t allow enemies to get caught in obstacles is good. Compared to dead-end places, places where enemies come from multiple directions tend to have less distance for enemies to move and are more likely to be constantly supplied with enemies.
When using Chroma, it is difficult to maximize its value unless there is an obstacle that can hide Effigy’s sentry. Circulus on Lua is often selected for earning Lua Thrax Plasms, but it seems like the tiles don’t have many places to meet those requirements.
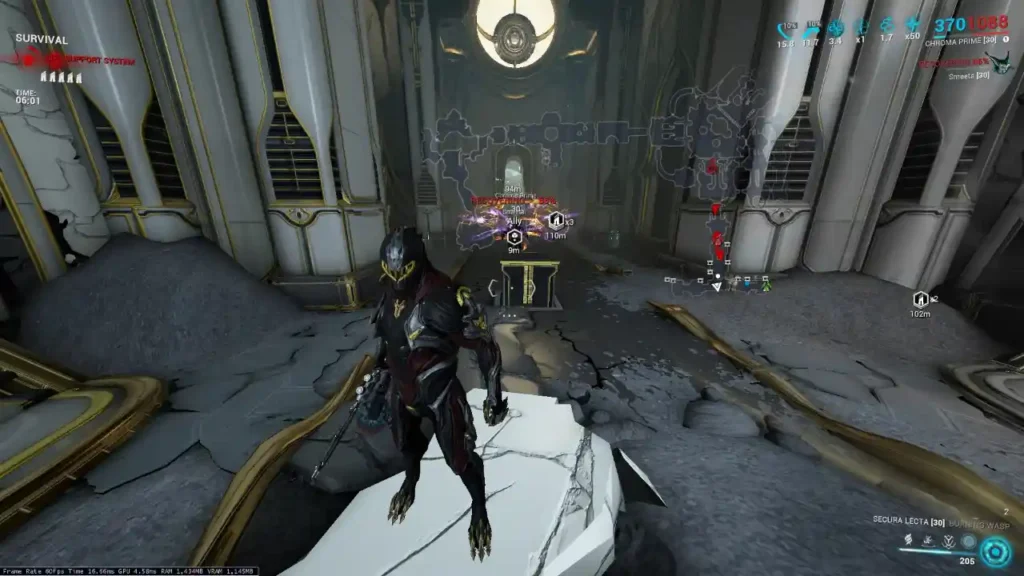
Comparing the credits earned in 5 minutes at 60fps without any boosters, when I didn’t use Effigy, both TItan on Saturn and Circulus often fell in the range of 250,000 to 370,000. When I used Effigy, Titan was 400,000~680,000 while Circulus was 350,000~550,000, which rarely exceeded 600,000.
The highest value I got in Circulus, 670,000, was when I fought on the same tile as the image below. At that time, I placed the sentry in the position shown in the image and fought in front of the obstacle. Additionally, most of the enemies were coming from both sides of the image. On the other hand, the highest value obtained in Titan is from the run shown in the video, which is equivalent to 750,000 by this calculation.
hey i was wondering is it possible to farm on normal path?
The amount you get will decrease because there are fewer enemies, especially in solo.
might as well do index imo
since a primary weapon is not used, i found that using a Speargun modded for magnetic is good, for priming for Melee Vortex. Scourge Prime also makes enemies less likely to shoot you, for defense, or Ferrox is good for pulling enemies together or pulling them around annoying corners. This also lets you use Primary Obstruct to disarm some enemies, making them run towards you instead of shooting from far away. 🙂 thank you for guide
Tenet Ferrox with + Impact as its trait does let you use Primary Exhilirate, which can be a surprising amount of energy. Unfortunately it doesn’t work while channeling, but its useful to have in your bag of tricks.
Since there is no primary, would something like Felarx also work to take care of acolytes due to its high damage?
The +2000% evolution is not effective due to their damage reduction.
why do we need guardian derision?
There is no need. It was used just because there were no other mods that seemed useful.
I’m in the process of copying the build, just need the kitgun but I’ve testing with chroma and secura lecta but life support seems to be an issue. I am in the same node as the video and I understand the surrounding rooms can be a factor but is there anything else? Also are you killing one enemy when gas stacks hit 10 like what are you looking for?
1. One thing I didn’t mention is that enemies don’t spawn in the area you can see on the screen, but unlike the Endo farm in Sedna Arena, making use of this would be difficult.
2. More precisely, when killing an enemy, it is important that the enemies around it, not that enemy, have 10 Gas and at least 1 Electricity stacks.
is the secondary necessary?
No, it does not directly affect Credits.
It is now more viable to use Melee Vortex by replacing Smeeta (which is now useless) to a Chesa Kubrow with Prosperous Retriever. Mod the claws for Brute Conditioning, Bell Ringer, Mecha Overdrive and Magnetic Strike to get consistent Magnetic Procs, use Frenzied Posture to get as many Magnetic procs on different enemies. You can also use bond mods to spread stacks (less viable as it takes a while for the kubrow to kill an enemy). Make sure you have a high status chance primary as well for Mecha Overdrive to receive full benefits.
**kubrow does NOT need to be a Chesa, it’s just that the Retrieve mod it gets can double drops.
Retriever mods can go on any beast companion
The “Retrieve” mod cannot be put on any other kubrow besides the Chesa Kubrow. Because it is a CHESA augment.
Why the Brute Conditioning and Bell Ringer?
NVM I saw the other mods
first time trying this method, no booster, i got 100k per minute
More fps is better?