Hysteria Valkyr Build | Solo Steel Path Void Cascade Level Cap
This is a build for solo level cap runs in Steel Path Void Cascade (Grineer). Maintain constant Hysteria, and mainly use Slide Attacks but 12x Heavy Attacks against enemies with Overguard.
The following two points should be kept in mind when you make a similar build.
1. The build must be able to easily take down Lv.9999 Thrax Centurion, which has about 15.52 million Overguard, 9.67 million Health, and about 200,000 Armor in Steel Path. Since Hysteria has little chance to inflict Slash procs, armor strip is mandatory.
2. Energy orbs are the main source of energy recovery during Hysteria. However, it is difficult to receive a stable supply of energy orbs in Void Cascade because there are many situations where enemies are left behind to move other rooms. Therefore, the build should be even more energy-oriented than builds used for Survival missions.
Youtube Link:
[Warframe] Hysteria Valkyr | the Steel Path Void Cascade | Solo Level Cap (Patch 32.3.5)
Builds
Required: critical and hard to find a simple alternative
Recommended: high priority, but can be removed or alternatives exist
Optional: contribute only modestly or depend on preference
Alternative: main alternatives to “Recommended” and “Optional”
Valkyr Prime


Fleeting Expertise (rank 4), Streamline
Hysteria’s energy drain per second must be kept to 3.75/s. When other ability costs are included, 175% Ability Efficiency consumes the least amount of energy, even taking into account the duration of abilities. Nevertheless, a combination of Streamline (rank 5) and 282%+ Ability Duration or Fleeting Expertise (rank 5) and 160%+ Ability Duration can also achieve 3.75/s, and these builds are also probably practical.
Primed Flow
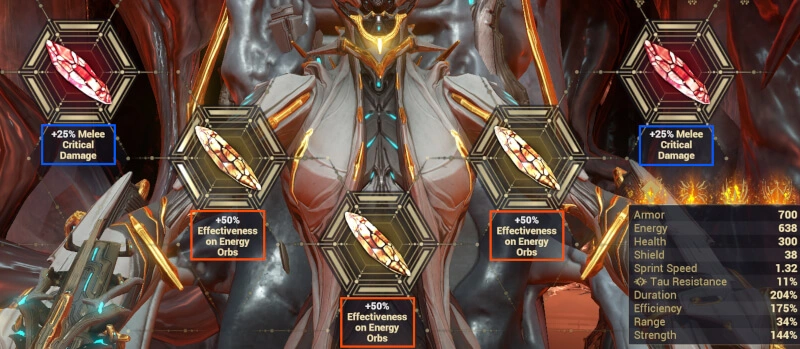
Maximum energy of 638 is equivalent to about 170 seconds of Hysteria’s energy consumption.
Arcane Energize, Amber Archon Shards (+50% Effectiveness on Energy Orbs) * 3
They are needed to quickly recover the reduced energy, and further increases in Amber shards is an option. You should always pay attention to your energy pool and recover it close to the maximum before moving to other rooms.
Swift Momentum
Both effects are beneficial for 12x heavy attack. As there are often no enemies around, +Combo Duration is especially essential.
Hysteria Assault
This augment allows Valkyr to remain invulnerable for 0.5 seconds when she aim, and she can fire a gun while maintaining invulnerability.
Narrow Minded, Primed Continuity, Constitution, Augur Message
Since Ability Duration affects the energy drain per second, 100%+ (80%+ if Streamline is rank 5) Ability Duration is required, and it is also recommended to increase it as much as possible for Warcry and Xata’s Whisper.
Umbral Intensify, Molt Vigor, Transient Fortitude, Augur Secret, Molt Augmented
They affect both Hysteria and Xata’s Whisper and highly contribute to the final damage. As Operator abilities are used frequently in Void Cascade, Molt Vigor is naturally triggered. Molt Augmented has a need to reactivate Hysteria and a risk of losing buffs on death.
Crimson Archon Shards (+25% Melee Critical Damage) * 2, Crimson Archon Shards (Ability Strength)
+Melee Critical Damage gives slightly more damage in this build, but the difference is only about 1% if Xata’s whisper is activated. Compared to the case without shards, the damage is about 23% higher.
Decaying Dragon key
Decreasing the maximum shields from 150 to 38 reduces the time needed for fully recharging shields from about 6.67 + 4 seconds to about 2.25 + 4 seconds. It is recommended because Shield Gating prevents one-shot deaths when you fail to finish shooting within 0.5 seconds.
Rolling Guard
It is an option in preparation for safely distancing yourself from Violence if Hysteria is nullified. Since Acolytes can be restrained by Magus Lockdown immediately after their appearance, it is not always necessary. (Recommended if the faction is Corpus.)
Eternal War
Killing enemies can extend the duration of Warcry up to twice as long, but it’s not expected to be permanent in this mission.
Helminth
Replace Rip Line or Paralysis with a Helminth ability. If anything, Rip Line might have a use as a means of transportation.
Xata’s Whisper
Out of all Helminth damage buff abilities, it deals the most damage to Overguard without special conditions. In addition, there are advantages that its additional damage is tripled again on headshots and Void procs count for the damage bonus of Condition Overload.
Nourish
As Nourish increases energy multiplier, replacing Amber shards with Crimson shards (+25% Melee Critical Damage) can inflict 6% more damage to Overguard than Xata’s Whisper. Despite the disadvantage of higher energy cost and shorter duration, it is a comparable option.
Valkyr Talons

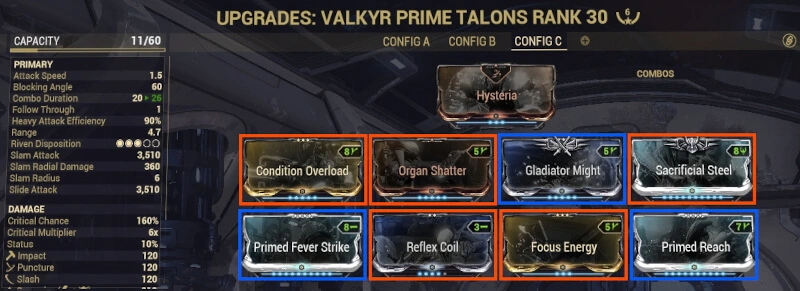
Reflex Coil, Focus Energy
Heavy Attack Efficiency of 90% is essential as there are often few enemies around and it can be difficult to gain Combo Count.
Condition Overload
Compared to Primed Pressure Point, it inflicts about 1.6 times more damage with 4 status types and about 2.8 times with 8.
Sacrificial Steel
Combined with 3 sets of Gladiator mods, it gives 435% Critical Chance for Heavy Attacks and 325% for others at 12x Combo Multiplier.
Organ Shatter, Gladiator Might
13x Critical Multiplier at Tier3 Critical, 17x at Tier4 (16x, 21x with Archon shards).
Primed Fever Strike, (North Wind)
The damage to Overguard is 1.3 times higher than 90% elemental mods. Since Ferrite Armor is weak to Corrosive, armor strip can be omitted while enemy levels are low. (If the faction is Corpus, Magnetic may be better owing to Proto Shields resistant to Corrosive damage.)
Primed Reach
The impact of extending range by 3m is significant, as the original range is only 1.7m.
Drifting Contact
Swift Momentum, Primary Dexterity, and Secondary Dexterity give you Combo Duration of 26 seconds, but even still, there are occasions when a Heavy Attack must be used for resetting the combo timer. As it’s exhausting to pay attention to Combo Counter so often, extending Combo Duration even further is an option.
Cedo
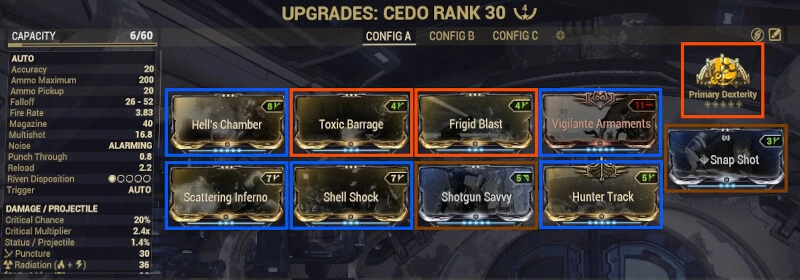
Only Alternate Fire is used for the purpose of inflicting status effects widely. In addition to being able to inflict up to 6 status types: Slash, Blast, Heat, Cold, Electricity, and Toxin without mods, it is easy to fire within the 0.5 seconds obtained by Hysteria Assault.

Primary Dexterity
Required for Combo Duration.
Toxic Barrage, Frigid Blast
Viral, which can increase the damage to health by up to 4.25 times, is essential.
Scattering Inferno, Shell Shock
Radiation status effects is useful for protecting Operator.
Hell’s Chamber, Vigilante Armaments
By increasing the number of glaives launched by Alternate Fire, the number of status procs also increases.
Hunter Track, Lingering Torment
Spectral forms of Thrax are immune to status effects but can inherit them from the physical forms. Therefore, if Viral stacks are inherited, Amp damage to spectral forms will also increase. It is recommended to adopt at least one because Cold status effects extend the invincibility of form transitions.
Shotgun Savvy
Regardless of Status Chance, the glaive’s explosion inflict two status effects: one is selected from Heat, Cold, Electricity, and Toxin and the other from Blast and modded elements. Since Status Chance affects only direct hits of glaives, its priority is not high.
Snap Shot
There seems to be no good choice because Fatal Acceleration makes homing capabilities of Alternate Fire a little weaker.
Secondary
Secondary is not used.
Secondary Dexterity
Required for Combo Duration.
Augur Seeker, Augur Pact
Shields can be restored by casting abilities thanks to the set bonus, but it is necessary to use abilities multiple times to restore to the maximum because of high Ability Efficiency. Since you can use Hysteria’s invulnerability until your shields are fully restored, there is little need to use abilities consciously.
Amalgam Barrel Diffusion
Speeding up rolling animations gives you more time to act while invulnerable combined with Rolling Guard.
Praedos
Although not used as a weapon, Praedos has beneficial passives which are +20% Sprint Speed and +30% Parkour Velocity.
Gladiator Might, Gladiator Rush, Gladiator Vice
They provide Exalted Weapon with up to +330% Critical Chance.
Focus School
Unairu
This build is created on the premise of armor strip by Caustic Strike. Besides, Unairu Wisp can amplify the operator damage, and the knockdown immunity provided by Poise are useful because of the use of Cedo’s Alternate Fire and Phahd Scafford.
Operator Arcanes
Magus Lockdown
It serves to prevent Violence from casting Silence by immediately dropping a tether mine when he appears.
Emergence Dissipate, Emergence Renewed
You can easily recover energy even during Hysteria by canceling Void Sling towards a group of enemies. However, opportunities to use it is limited as enemy level increases because frequent activating Eternal Onslaught makes Operator’s energy tight. You can also recover some Operator’s energy when moving with Void Sling, but Emergence Renewed might be better suited for that purpose.
Emergence Savior
It can reduce the number of times that Operator’s actions are interrupted owing to fatal damage.
Operator Amps
Cantic Prism, Raplak Prism
It can inflict high headshot damage in a short period of time. In addition, it is handy to close Void rifts.
Phahd Scaffold
It is possible to close multiple Void rifts with a rough shot, and combined with Caustic Strike, to revive your Warframe during Last Gasp even at Lv.9999.
Certus Brace
Cantic Prism has guaranteed critical hits with Eternal Onslaught.
Amp Arcanes
Eternal Eradicate
The simple condition of using an Operator ability ensures 1.6 times Amp damage.
Eternal Onslaught
The expected damage of Cantic Prism is increased by approximately 1.69 times. If you are able to consistently hit the head with 8 or more Viral stacks, it may not be necessary because even without it, the chance of failing to kill Thrax within two shots is less than 1%.
Damage Calculations
Heavy Attack
Below are some of the one-shot conditions of Lv.9999 Thrax in this build. If you deal damage that exceeds the remaining amount of Overguard to an eneny with Overguard, the total damage dealt is the sum of the damage bypassing Overguard and the remaining amount of Overguard. (The HUD damage numbers on physical forms of Thrax are capped at the sum of remaining Overguard and health.)
12x Heavy Attack + Tier4 Critical + 8 status types:250 * 6 * 12 * 21 * 3.25 * 1.89 * (1 + 0.8 * 8) = 17,181,801
12x Heavy Attack + Tier5 Critical + 6 status types:250 * 6 * 12 * 26 * 3.25 * 1.89 * (1 + 0.8 * 6) = 16,673,202
12x Heavy Attack + Tier4 Critical + 4 status types (2 Viral stacks) + Xata’s Whisper:
(Overguard) 250 * 6 * 12 * 21 * 3.25 * 1.89 * (1 + 0.8 * 4) * (1 + 0.26 * 1.89 * 1.5) ≒ 16,939,909
(Health) 250 * 6 * 12 * 21 * 3.25 * 1.89 * (1 + 0.8 * 4) * (0.26 * 1.89) * 2.25 ≒ 10,782,114
11x Heavy Attack + Tier4 Critical + 5 status types (1 Viral stack) + Xata’s Whisper:
(Overguard) 250 * 6 * 11 * 21 * 3.25 * 1.89 * (1 + 0.8 * 5) * (1 + 0.26 * 1.89 * 1.5) ≒ 18,486,012
(Health) 250 * 6 * 11 * 21 * 3.25 * 1.89 * (1 + 0.8 * 5) * (0.26 * 1.89) * 2 ≒ 10,458,841
Slide Attack
Slide Attack has a maximum of six hits with a 300% multiplier, and the Critical Multiplier is one tier lower than that of Heavy Attack. Although the damage is about one-fifth that of 12x Heavy Attack even with six hits, Slide Attack alone should be sufficient to fight until about Lv.2000.
Tier3 Critical (6 hits) + 5 status types (without Viral) + Xata’s Whisper:
(Overguard) 250 * 3 * 17 * 3.25 * 1.89 * (1 + 0.8 * 5) * (1 + 0.26 * 1.89 * 1.5) * 6 ≒ 640,208 * 6 ≒ 3,841,248
(Health) 250 * 3 * 17 * 3.25 * 1.89 * (1 + 0.8 * 5) * (1 + 0.26 * 1.89) * 6 ≒ 549,655 * 6 ≒ 3,297,930
Amp Damage
Amp damage is 10 times normal to spectral forms of Thrax. Although not strictly verified, the health bonus of Steel Path does not work on the spectral forms, and it is estimated that they have about 3.87 million health at Lv.9999.
Cantic Prism
Tier1 Critical Headshot (3 hits) + Unaru Wisp + Eternal Eradicate + 4 Viral stacks: 1460 * 10 * 2 * 2.2 * 3 * 2.6 * 2.75 * 3 = 1,377,948 * 3 = 4,133,844
Tier1 Critical Headshot (2 hits) + Unaru Wisp + Eternal Eradicate + 9 Viral stacks: 1460 * 10 * 2 * 2.2 * 3 * 2.6 * 4 * 2 = 2,004,288 * 2 = 4,008,576
Tier2 Critical Headshot (1 hit) + Unaru Wisp + Eternal Eradicate + 10 Viral stacks: 1460 * 10 * (2 * (2 * 2.2 – 1) + 1) * 3 * 2.6 * 4.25 = 3,775,122
Headshot (5hits) + Tier1 Critical Headshot (1hit) + Unaru Wisp + Eternal Eradicate + 8 Viral stacks: 1460 * 10 * 3 * 2.6 * 3.75 * 5 + 1460 * 10 * 2 * 2.2 * 3 * 2.6 * 3.75 = 427,050 * 5 + 1,879,020 = 4,014,270
Raplak Prism
Tier1 Critical Headshot + Unaru Wisp + Eternal Eradicate + Viral 6 stacks: 3000 * 10 * 2 * 2.6 * 3 * 2.6 * 3.25 = 3,954,600
Notes
・If the marker colors of possessed Exolizers and Thraxes are confusing, in Options → Accessibility → Customize HUD Colors, “Enemy” can change the former and “Attack” can do the latter.
・Since it can inflict a lot of damage without Xata’s Whisper as the above damage calculations show, builds such as Dispensary + Equilibrium + Synth Fiber or Naramon + Helminth armor strip are perhaps also practical. Especially if you don’t aim for level cap, these builds will be easier to handle.